If you’re like me, you’ve probably had that moment where you just couldn’t take one more waxing appointment or the harsh chemicals in store-bought kits. That’s when I decided to try how to make sugar wax at home. I was tired of spending so much on hair removal and wanted a natural, skin-friendly alternative.
The best part? I could make it with ingredients I already had in my kitchen. If you’re curious about saving time, money, and your skin, keep reading!
Why Make Sugar Wax at Home?
When I first decided to make sugar wax, I wasn’t sure it would work. After all, it sounded a little too good to be true—sugar, lemon juice, and water? That’s it? But once I tried it, I realized why so many people swear by sugaring.
Sugar wax is much gentler on the skin than traditional wax. Unlike regular waxes, which stick to both hair and skin, sugar wax only adheres to the hair. This means less irritation and a more gentle, skin-friendly experience. Plus, it’s all-natural, so I don’t have to worry about any chemicals.
Ingredients You’ll Need to Make Sugar Wax
Making sugar wax at home is incredibly simple. Here’s what you need:
Ingredients:
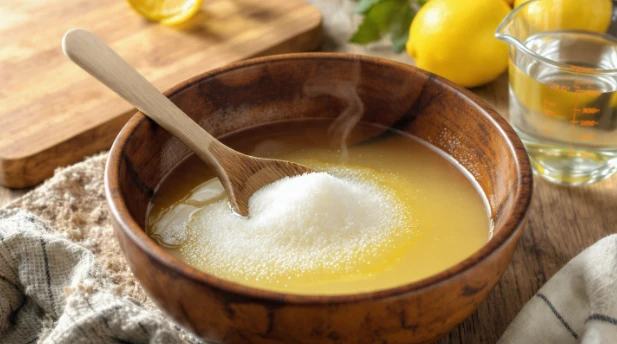
- 1 cup white granulated sugar
- 1/4 cup lemon juice (helps prevent the sugar from becoming too hard)
- 1/4 cup water
Supplies:
- Medium saucepan (for bubbling the mixture)
- Heat-safe jar (for storage)
- A spatula or spoon (for mixing)
That’s it! The best part is that these ingredients are easy to find and inexpensive.
Step-by-Step Instructions on How to Make Sugar Wax
1. Combine the Ingredients
Start by adding the sugar, lemon juice, and water into your saucepan. Stir until everything is well combined. You want a smooth consistency before heating.
2. Boil the Mixture
Place the pan over medium-high heat. Bring the mixture to a rolling boil. Make sure you stir frequently to avoid burning. Once it starts to bubble, turn the heat down slightly to prevent the sugar from caramelizing too quickly.
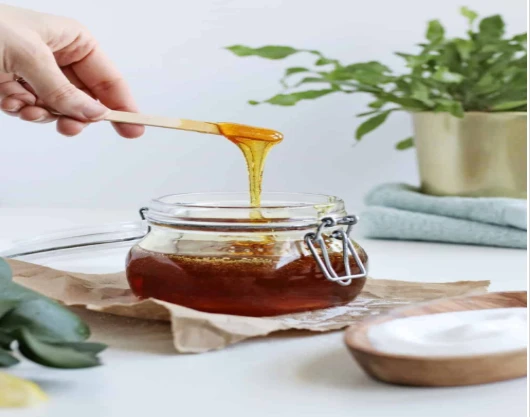
3. Simmer and Check the Color
Once boiling, reduce to medium-low heat. Let it simmer until it turns a golden amber color (think honey or light caramel). This can take about 5–10 minutes, but keep an eye on it. Don’t let it get too dark; otherwise, it will harden and become too difficult to use.
4. Test the Consistency
Take a small spoonful of the mixture and drop it into a bowl of cold water. If it forms a soft, pliable ball that holds its shape but is still stretchy, you’re good to go!
If it’s too runny, let it simmer for another minute or so and test again. When it’s perfect, remove it from the heat.
5. Cool and Store
Pour the mixture into a heat-safe jar and let it cool for at least 30 minutes. The wax should be warm, but not too hot. It will be easy to handle when it’s just a bit above room temperature.
How to Use Sugar Wax for Hair Removal

Once your wax is ready, it’s time to use it! Follow these simple steps for a smooth waxing session at home:
Step 1: Prep Your Skin
Make sure your skin is clean and dry. You can lightly dust the area with baby powder or cornstarch to help the wax grip the hair, not your skin.
Step 2: Apply the Sugar Wax
Take a small amount of the wax and apply it against the direction of hair growth. Use your fingers or a spatula to smooth it out, just like you would with traditional wax.
Step 3: Remove the Wax
Here’s the trick: Hold your skin taut with one hand and, with the other, quickly flick off the wax in the direction of hair growth. If you prefer, you can also use fabric strips for a smoother removal. The key is speed, so don’t hesitate!
Step 4: Clean Up
Since sugar wax is water-soluble, cleaning up is a breeze. Simply use warm water to wash off any wax left on your skin or tools.
Important Safety Tips for Sugar Waxing
1. Avoid Burns
Never apply hot wax directly to your skin. Always test it on your wrist to ensure it’s a safe, tolerable temperature before applying it to larger areas.
2. Aftercare
After waxing, it’s best to avoid exfoliating, direct sunlight, or hot showers/saunas for at least 24 hours to prevent irritation. Hydrate your skin to keep it soft and smooth.
Frequently Asked questions
1. What is the ideal consistency for sugar wax?
The wax should be soft and pliable when cool, able to hold its shape but still stretchy. If it’s too soft, it won’t remove hair effectively. If it’s too hard, it won’t spread evenly.
2. How do I store sugar wax?
Store your sugar wax in a heat-safe jar or container with a tight lid. It lasts for several weeks when stored at room temperature. Just reheat it before using.
3. Can sugar waxing work for all hair types?
Yes! Sugar waxing works for all hair types, but it’s particularly effective for fine to medium hair. If you have thicker or coarser hair, it may require multiple passes, but it’s still a great natural option.
4. How often can I sugar wax?
Sugar waxing can be done every 2-3 weeks, depending on how quickly your hair grows. Make sure to give your skin a little rest between sessions, especially if it’s sensitive.
DIY Sugar Waxing—It’s Easier Than You Think!
At first, I thought DIY sugar waxing sounded like a complicated project best left to the pros. But after a couple of tries, I realized how simple and effective it can be. It’s all about consistency—getting the right texture and using the correct technique makes all the difference.
If you’re looking for a gentler, cheaper, and natural hair removal alternatives to shaving and waxing , then making your own sugar wax is a total game-changer. Plus, it’s a great way to skip the chemicals while still getting smooth, hair-free skin.